Rich Ross

Hasa diga eebowai

Boy, its easy to be dumb (Anatomy of a disaster, redux)

From Reefs.com

As some of you may remember from my previous article ‘The anatomy of a disaster” http://www.reefsmagazine.com/forum/reefs-magazine/66910-epic-fail-anatomy-disaster.html  I have a penchant for not keeping up on float switch maintenance and ending up with kalk overdoses. Regardless of the failsafes I put in place, I continue to OD on kalk, and guess what, I did it again recently, and I humbly present to you the newest of precautions I have put in place to possibly save my lazy butt from yet another disaster.

The last disaster was really, really bad.

The most current kalk issue was not nearly as bad as the previous one. Last time I lost 95% of my SPS corals, where this time I only lost 2 – though some of them are going to take a month of so to recover completely.

When I caught it, the pH in the tank was 9.7, bad but not immediately kill everything bad. My sump is essentially a 180 gallon tank so when the primary float switch failed about 15 gallons of yummy kalk water was pumped into the tank until the secondary float switch, located about 3 inches above the primary clicked into action.

This time, instead of dumping gallons of vinegar in the system to lower the pH, I tee’d off of the CO2 feed to my calcium reactor and bubbled CO2 directly into the display tank. CO2 is better for a couple of reasons, the most important being the lack of bacterial bloom that results from gallons of vinegar being dumped into a saltwater system. Since the system wasn’t totally crashed, this was very important to me. Another good thing about the CO2 addition is that its effect of lowering pH is very fast and its hard to overdose – just take line out of the tank. Getting the pH down to 8.2 took less than 10 minutes, and the change was startling. Fish that were clearly stressing and hiding came right out and ate. A Linkia starfish that looked to be dead, perked right up. LPS corals started opening up within 30 minutes. I like the CO2 much better than vinegar. Of course, it should be obvious that CO2 can be dangerous for both your tank and you, so be careful and I wouldn’t even think of doing it without a calibrated electronic pH meter.

So what did I do to avoid this avoidable problem in the future. First, I further slowed the amount of water pumping into the system via the Auto Top Off. I also put the ATO on a timer with an on/off cycle of 30 minutes.   The system can still move enough water to keep up with top off, but it takes time to fill it up, and that less time means more time before the problem becomes critical.

The second thing I did was reconfigure the sump equipment so it was all easier to get to and maintain. Easier and neater means faster and better regular maintenance. Now, the switches are right up front, in a dark space and soaking them in vinegar takes a matter of minutes. Easy peasy. I also modified the way the float switches were laid out. Now, instead of 3 inches between primary and secondary float switches, resulting in a 15 gallon addition, there is about .5 inches, resulting in a 3ish gallon addition before the secondary kicks in. Its such an obvious modification that I marvel at my lack of making it immediately upon receiving the float switches.

A modification so obvious that I should have done it long ago (The second set of floatswitches is for the auto fill for water changes)

The third and most important think I did was set up a 4 month recurring calendar event on my computer to remind me to do the regular cleaning.

Will this work? Will I avoid disaster in the future? Only time will tell…
Acclimation of new animals

From TONMO and Reefs.com

When you receive a new saltwater animal you don’t want to just dump it into its new home. You want to give it time to get used to any water parameters that may be different from the water in the bag and the water in the tank.The basic idea of acclimation is that you slowly adjust the water in the shipping bag of the animal until it matches the water chemistry of your tank giving the new animal time to adapt to the new water chemistry before release into its new home. Makes complete sense, however, some ‘old aquarists tales’ have entrenched themselves in the e literature and subconscious of aquarists and I think that these ideas are at best a waste of time and at worse detrimental to the health of the animal. Below, I hope to outline reasonable acclimation procedures and present reasons why some of the ‘acclimation myths’ should be abandoned.There are many ways to go about acclimating new animals to your aquarium. Here is my rundown on the basics for a new animal that looks healthy in a bag of relatively clear water.

  • Float the shipping bag in the new aquarium or sump to get the water in the bag to match the temperature of the tank (if the new animal is a fish or coral please use a quaranteen system to avoid introducing parasites to the show tank, but for cephs and other inverts this seems not to be an issue). . This should take no more than 10 or 15 minutes.
  • Remove the bag from the tank and either decant the animal into a bucket (making sure to put something under one side of the bucket to tilt the bucket so the water is deep enough to keep the animal comfortable) or open the bag and clip it to the side of the inside of the bucket. If decanting you will be doing the acclimation in the bucket, if clipping you will be doing the acclimation in the bag. Either way, the goal is to make sure none of the bag water makes it into your tank because it could be ‘infected’ with parasites, but more probably its nasty from having an animal sit in it for 24+ hours.
  • Begin adding tank water to the bag or bucket. This can be accomplished with a cup, or you can siphon water from the tank with an airline hose equipped with a valve or tied in a couple of knots to control the speed at which water is added. General rates of tank water addition are 1/2 cup every 3-5 minutes, or if dripping, 1-3 drops per second. If using a clipped bag you are looking to have extra water overflow into the bucket over time. This process should take 30 minutes to an hour, then move the animal to its new tank.

It should be glaringly obvious that there was no water testing mentioned in the above procedure. This is because, really, once you receive the animal you’ll have to do something with it regardless of the availability of water testing and the above procedure is pretty comprehensive. That doesn’t mean they can’t be useful. Mostly, we are concerned with salinity, pH and temperature so testing those parameters to determine when the tank water and the water the animal is in match can reduce the acclimation time. You don’t want to adjust any of these paramaters too quickly, but you also don’t want to dawdle. It seems that there isn’t much to be done about most other parameters, so testing doesn’t seem necessary except for the ones mentioned above if possible.The other parameter we care a lot about is ammonia, and it is important to note that it is linked with pH. Ammonia can be lethal to the animals, but its toxicity can be depressed by low pH. Over time in a closed shipping bag the pH of the water lowers which is great because the ammonia generated by the biological processes going on in the bag is rendered less toxic than it otherwise might be. However, once you open the bag and let fresh air in, the pH begins to rise and the ammonia becomes more toxic. This is why I suggest temperature acclimating while the bag is still sealed.If the water is nasty when the shipment arrives, if you test and find that ammonia is high, I would ignore most if not all of the acclimation procedure and get the animal out of the toxic soup immediately. Sure the other parameters may be off, but you have to get the animal out of the toxic water. Its a risk, but I feel its one worth talking because you know the bad water in the bag is killing the animal.All of the above can, of course, be modified based on your saltwater common sense and experience. You have to trust you, and no recipe can replace your developed saltwater thumb.The mythsThe biggest persistent myth I see is ‘the longer the acclimation the better’ which has resulted in people going through the procedure for 2-8 hours (in at least once case – over night!). The idea that the animals we are dealing with are fragile is true to some extent, but they are also pretty robust within reason and can deal with reasonable changes in environment. A super long acclimation just isn’t necessary and can be detrimental – ammonia levels can rise, temperature in the acclimating vessel can drop, and the animal can be stressed. Longer is not necessarily better, so either test to make decisions or be reasonable.The other myth I see happening with some frequency is bubbling air into the shipping bag. Sure it seems to make sense – the animal has been in a bag for a long time and the oxygen must be depleted so give it some. However, as we have seen above, this is the exact opposite of what you want to do because the fresh air will increase the pH of the water and will raise the toxicity of any ammonia that surely is in the water.I hope this is helpful, and as always, please let me know if anything is missing or if there are any questions.Finally, here is a link to one of my favorite online vendors acclimation instructions.http://www.liveaquaria.com/PIC/article.cfm?aid=157

Packing and Shipping cephs

From TONMO

Several people have recently asked how I ship cephs, so I thought I would write up what I do and stick it on the blog for posterity. I am hoping to ship some cephs in the next few weeks and if I do, I will try to update this post with photos.

Mostly I ship eggs and hatchling Sepia bandensis, but have used the procedure for juveniles, adults as well as octopus of various sizes – everything is just scaled up. Basically, you stick the ceph in a plastic bag with water and oxygen and seal it with a rubber band. Then you stick the plastic bag in an insulated shipping box and over night it to the person you are shipping the animals to. Details below. Remember describing simple things seems to make them seem more complicated than the really are, so don’t get overwhelmed by the detail!

Supplies

You are also going to need heat packs if the weather is cold or ice packs if the weather is really hot (jump online and check the weather at the departure city and the arrival city before you ship). Use 40 hour heat packs because of the insurance they give you in case the shipment is delayed a day. I like the uni heat available here http://www.amazon.com/40-Hour-Dispos…/dp/B0043XHZGC or maybe from your LFS. Any kind of ice pack will do.

Figure out how many plastic bags you are going to be shipping and of what size. This will determine what size shipping container you are going to need. I have put up to 4 hatchlings in a single 6 inch bag but this often is dependent on the size of the shipping container – if you have a larger container, you need to fill space with more bags, but if you have a smaller container you need to maximize the space you have.

Plastic bags and rubberbands to seal the bags are most easily obtained from a friendly LFS. Get enough to triple layer each bag of water to better ensure the any small leak from a ceph bite or other abrasion is not catastrophic. For hatchlings and eggs I use either small ‘frag’ bags or smal 6 inch fish bags, and if you can get the thicker bags over the thinner, the probability of leaks goes even further down.

You’ll needs some kind of insulated shipping container the size you are going to need. These usually consist of a styrofoam ‘inner’ box and a cardboard ‘outer’ box. You can usually get one from your LFS, though getting the size you want may be difficult, especially if you are shipping only one or two small hatchlings. Some people have used small ice chests with fine results, or made their own by cutting down styrofoam to fit in a smaller cardboard box.

I also put a small piece of macro algae in with the animals so they have something to hold onto during shipping.

Packing tape.

The address and phone number of who the animals are being shipped to (its never fun to fill out shipping paperwork only to find you don’t have all the information you need.

Determine when is the latest you can drop off the package at the shipping company, and try to pack and drop off the animals as close to that time as possible. The less time the animals spend in shipping the better. Also make sure you spring for morning deliver if possible, again, the less time in shipping the better.

Oxygen – I think its important, but some have shipped without it. I always use it. Your friendly LFS comes in handy here, and they will often let you use their oxygen if you have a good relationship with them. I always offer to pay them for any supplies they help me with, but have never actually been charged.

Packing

Fill the first bag with about 40% of tank water. Then add the macro algae if available, and then the ceph(s). Add oxygen to the bag, but don’t overfill because you want the bag to have a little bit of play to expand during time on the airplane with lower atmospheric pressure (most commercial planes are pressurized to 8000 feet). Twist the bag closed making a ‘stem’ that can be folded over itself for an even better seal. Seal the bag with a rubberband or two, making sure that the rubber band has been wrapped many times around the bag making a really tight seal. There is an art to rubber banding these bags, as well as several methods, so if you haven’t ever done it before practice and/or get someone experienced to help. Some LFS may even have a banding machine which crimps a small piece of metal around the ‘stem’ of the bag for an excellant seal.

Place the rubber banded side of the bag in the bottom of the next bag and then rubber band the second bag. This will eliminate any corners a small ceph may get trapped in. While flipping the bag, cuttlefish may ‘hang on’ to the plastic of the bag being exposed to air. No worries, be patient and wait for the animal to let go before proceeding. Seal the second bag with a rubber band. Repeat this step one last time for triple bagged goodness.

Place the animal packed bags into the shipping container and fill any extra space with packing peanuts, more rubber banded bags or any other soft material. The goal is to keep the bag from moving around during transport. Leave space above the bags for heat packs or ice packs.

If using an ice pack place it in a plastic bag and put some newspaper between it and the bags containing animals – direct contact can cause localized temperature changes. If using a heat pack, open the package it came in and shake the heat pack to activate it. Wrap it in newspaper and tap it to the top of the inside of the lid of the styrofoam ‘inner’ box. Heat packs stop working if they get wet, but they need oxygen to work, so don’t put them inside plastic bags.

Put the lid on the styrofoam ‘inner’ and seal lightly with tape. Then put the styrofoam box into the cardboard outer and seal that with packing tape.

Take the packed box to the shipping company, fill out the paperwork, give them money for shipping and have a nice dinner. Keep the tracking number handy so you can obsess over where the package is all night long.

Odds and ends

  • Ship to arrive the next business morning.
  • Never ship on a Thursday or Friday. Saturday deliveries are notorious for going wrong and if they do, the animals will sit until monday, which is too long. If you ship on a Thursday for Friday delivery and something goes wrong, you can end up with the aforementioned Saturday problems.
  • May shippers will deliver to one of their strip mall stores and hold the package for pickup. The advantage here is that no one needs to be home to sign for the package. FedEx uses Kinko’s and UPS has their own stores.

Let me know if there are any questions or if something is unclear and I’ll update the post as needed. I hope this is helpful.

Coral Warfare

From Reefhobbyst Magazine 

Corals are cool, mistakes happen, planning for the worst is awesome

From Reefbuilders

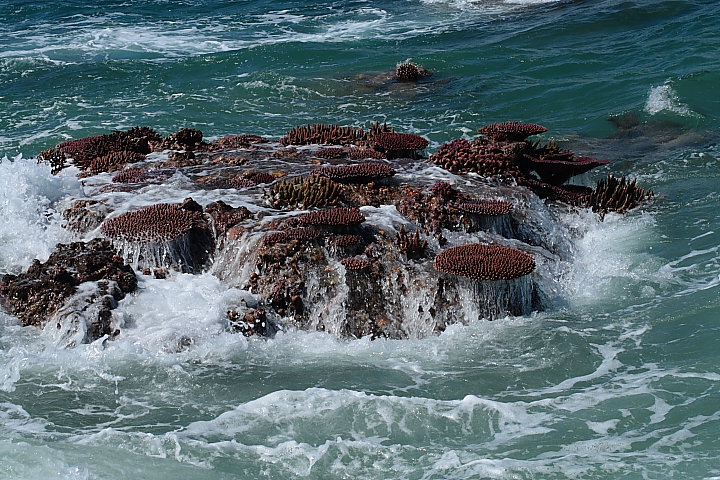
Those corals are at the northern point of Lambumbu Harbor on the Northwest (leeward) coast of Malakula in Vanuatu. This photo was taken by Chris Maupin during daytime spring low tide which occurs during Austral winter.

In an effort to make Jake’s head explode, I like to write about all the mistakes I make with my home reef system. Even though they may seem embarrassing, everyone makes bone head mistakes, and I think we all learn by hearing about others mistakes. Pretending they didn’t happen helps gives us a false sense of security, so here is how my day started at 5:15 am.

After dreaming about Chris Maupin’s photo above of corals exposed at low tide, I woke up to get ready for work, went downstairs and something sounded wrong in the area of the tank. With a sinking feeling I took a look and the water level in the tank was about a third lower than it should be – meaning the top 6 inches of my reef, a whole lot of coral, was exposed to air just like in the photo above. Ran under the house to check the sump and it was half empty. Ran back upstairs and looked behind the tank, stepped in water, and started flipping switches so the pumps that were running dry could have a break. Turns out I had left the valve that fills my experimental auto feeder open and the tank drained overnight. What a nice thing to wake up to three days before a two week vacation. At least it happened at night when the lights were off and the fans weren’t running.

I have written a lot about being prepared for disaster, and luckily I take my own advice to heart.  I went back under the house, flipped a switch and delicious, mixed, heated and aerated salt water from the 200 gallon reservoir I always keep filled started filling up the system. Within ten minutes I had circulation restored and began cleaning up. I didn’t have much water to clean up because, as planned,  it all went down the piping hole in the floor into the crawlspace under the house. I turned on all my circulation to blow the mucus off the corals that had been exposed. Most of the corals looked no worse for the wear, but we’ll see about the Seriatopora and Archohelia when I get home tonight (I expect them to be beaten but will recover). I even made it to work almost on time.

Moral of the story, corals are amazing and can do well for a while even when exposed to air, planning for the worst makes your life easier, add an emergency overflow drain into your autofeeder (if it fills with via a pump),  and know that mistakes will always happen (mine seem to happen about every two years).

CEPHALOPOD BREEDING